CI Development Routine
Daily Scrum: 9:30AM Daily
Peer Code Review: Every Friday
Sprint Period: 2 weeks
Sprint Planning: Bi-weekly (1st & 3rd Monday)
Sprint Review: Bi-weekly (2nd & 4th Friday)
Knowledge Sharing: Monthly (Every last Friday of the month)
Daily Scrum
DS is to get latest development updates. Each dev will answer:-
1. What did you do on previous working day? Scrum Progress %?
2. What do you plan to do today?
3. Any blockers?
Each dev should spend less than 3 mins to update. Anything longer should be in a separate discussion.
Expected Attendees:-
1. Project Manager (Optional)
2. Tech Manager
3. All dev
4. All support engineer
Sprint Planning
SP is to set a Sprint Backlog (Sprint Goal, Product Backlog, Deliverable Plan). Topics to cover:-
1. Why is this Sprint valuable?
2. What can be Done this Sprint?
3. How will the chosen work get done?
Product Backlogs will be entered into MantisBT.
Max time: 4 hours
Expected Attendees:-
1. Project Manager
2. Tech Manager
3. Product Owner
4. All dev
Sprint Review
SRV is to inspect the outcome of the previous Sprint and to determine future adaptations. Dev will present what was accomplished in that Sprint and its progress towards the Sprint Backlog. Incomplete tasks will be moved back to the Product Backlog. Product Backlog will be adjusted to meet new opportunities.
Max time: 2 hours
Expected Attendees:-
1. Project Manager
2. Tech Manager
3. Product Owner
4. All dev
Sprint Retrospective
SRT is to plan ways to improve quality & effectiveness. Topics:-
1. What went well?
2. What problems were encountered?
3. How were the problems solved?
4. What did you learn from this Sprint?
Max time: 1 hour
Expected Attendees:-
1. Project Manager (Optional)
2. Tech Manager
3. All dev
Peer Code Review
PCR is for dev to reduce code smells and also to improve coding style, convention and code readability. Review should be objective. The purpose is not to review system functionality. Each week, each dev will review code that was committed onto our SVN for the past week. Reviewer and reviewee will rotate every week so that each dev will have a chance to view coding styles of all team members.
Knowledge Sharing Session
KSS is for dev to share new technical skills or information on newly developed tech or modules to peers. Each dev will contribute to KSS every month.
Each module contains a permission file to configure and identify which role allow to take certain action on page or facility, follow below guide for the configuration steps:
After boot intellij, double tap “SHIFT” to search for permission.yml file or locate by path: \webapps\webappcore\src\main\java\ci\com\apps\webappcore\[module_name]\assets\config
– module_name represent the module you’re looking for to setup permission.- What if the module was newly added, possible the permission file haven create. To create a new permission file, simply copy an existing permission.yml file, and create the folder path start from [module_name]\assets\config– Once folder created, you can drop the copied permission.yml file into config folder and start editing permission content.
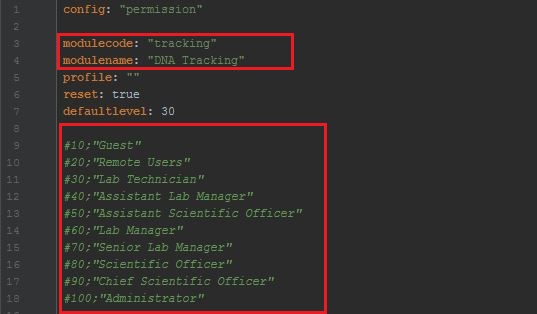
To modify the content, simply open new or existing permission.yml file by using any file editor or IntelliJ, and refer below image for more details:
– modulecode is to set which module using this permission, modulecode can refer from gulfile.js when setting xmodule.- modulename is the name of the module.- User role can be trigger based on the list of “green text”, #[number] represent rolelevel from Database table base_approles, but in opposite way, which mean if #20 “Remote Users” in table will be list as rolelevel 90.
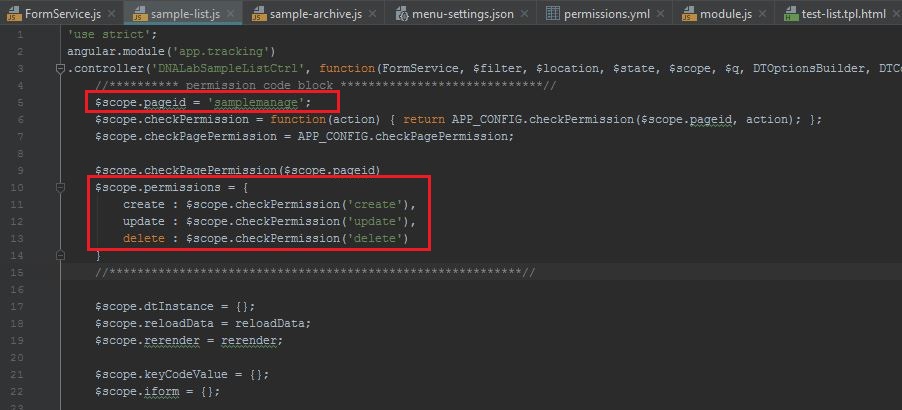
After setup the identification of the permission, next will be configure what page allow to take what action. Before we go for the list, you can retrieve the page id and action from JS file, take sample-list.js as example, refer below image:
– $scope.pageid is represent the page name to use in permission file- $scope.permissions is represent what action can be taken from the page, default will be create, read (default), update, delete, which equal to #crud in permission.yml.
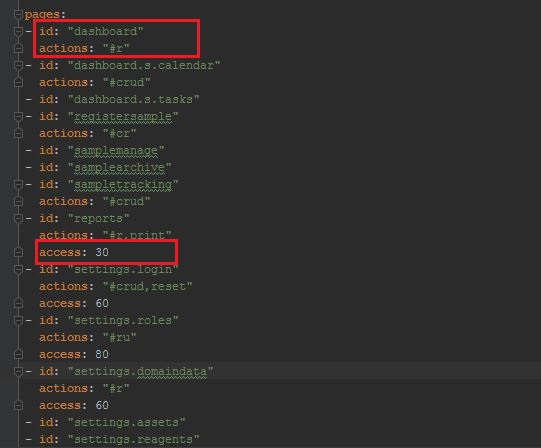
– id represent the page id / name retrieve from JS file
– actions represent the permission control in page
– access represent the role level, level can refer from step 2
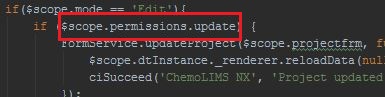
To set permission command / code into DOM, simply refer below example:
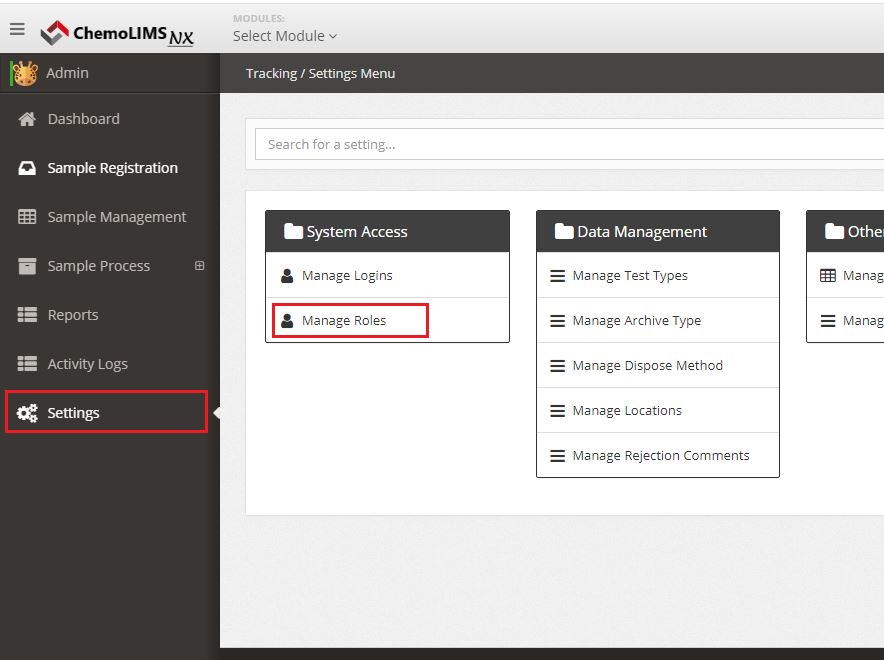
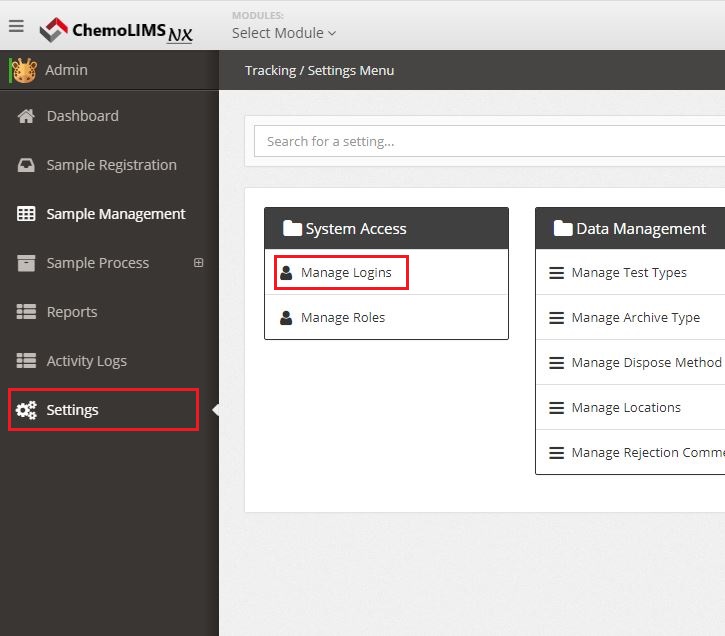
Now move to UI/UX, login as Administrator account and to completely install permission into the selected module, navigate to Settings > Manage Roles.
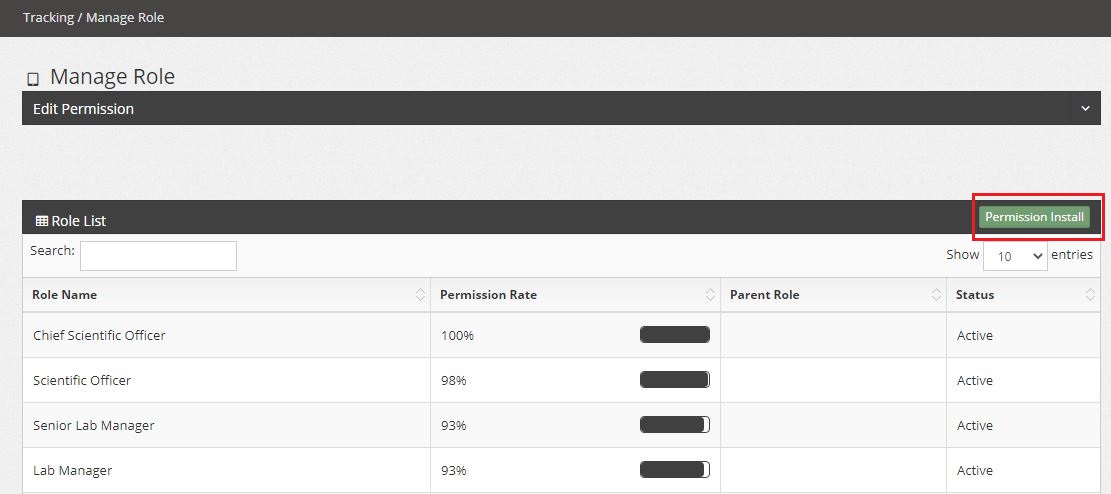
In Manage Role page, look for the green button “Permission Install” and click on it. A pop should appear to let you insert the permission content copy from permission.yml file.
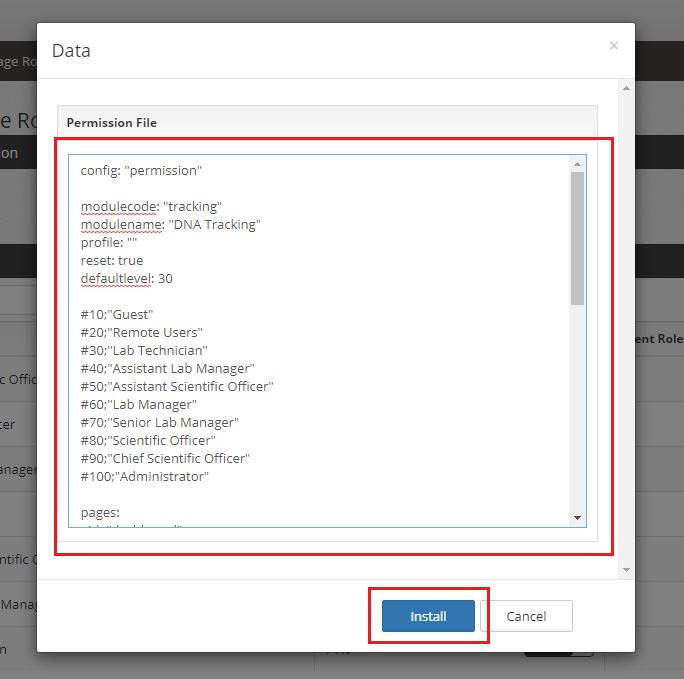
After a pop up appear, just insert the permission content into the text box / text field, and click “Install” to save the permission into database. Once install successfully, a “success” message will be show beside the Install button. Refresh the page and the table shall display properly if the permission set correctly.
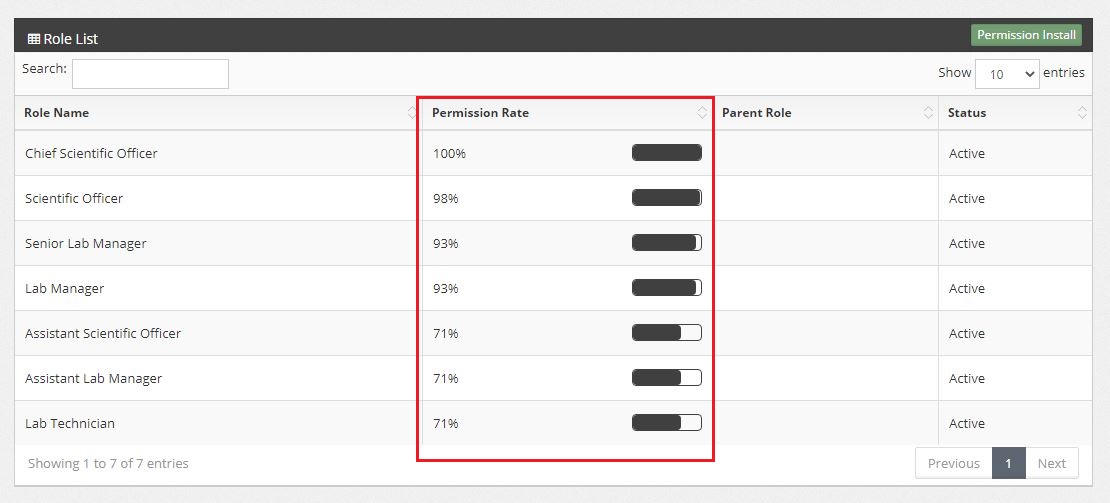
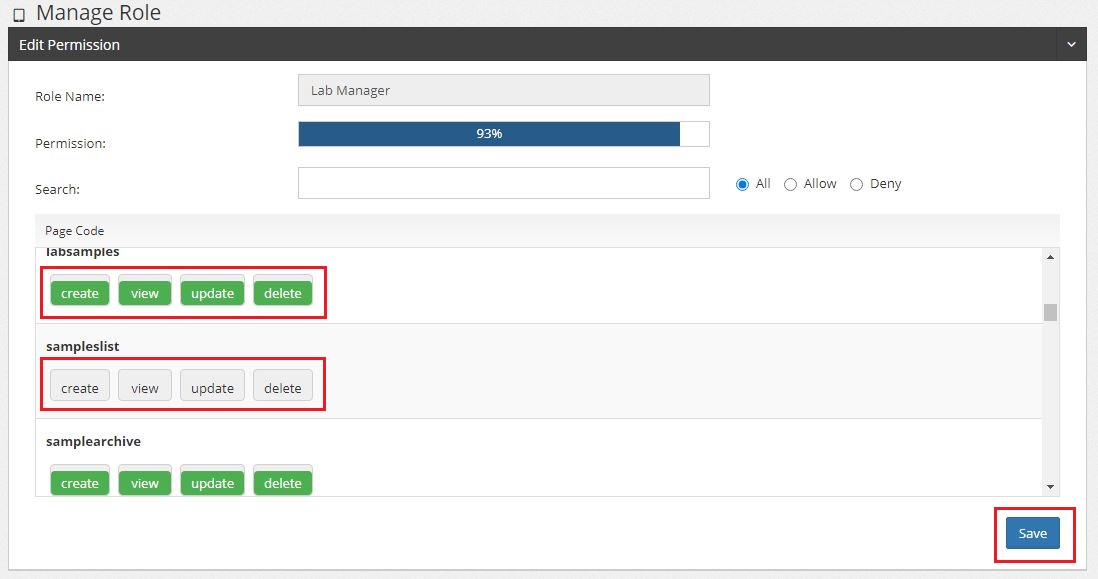
To trigger the permission for specific role to use under UI/UX, simply click any role row from the table, and a slide down form will display on top of the table.
– Permission Role represent how many percent of action can be perform on the role.
Below image is the slide down form to setup how many permissions can be perform in a page.
– Click the button one time and change to green color, permission will be Activate and allow the role to take that action.
– Click the button one time and change to grey color, permission will be Deactivate and not allow the role to take that action.
To change the role from user account, login as Administrator or any account have the right to modify login details, and navigate to Settings > Manage Roles.
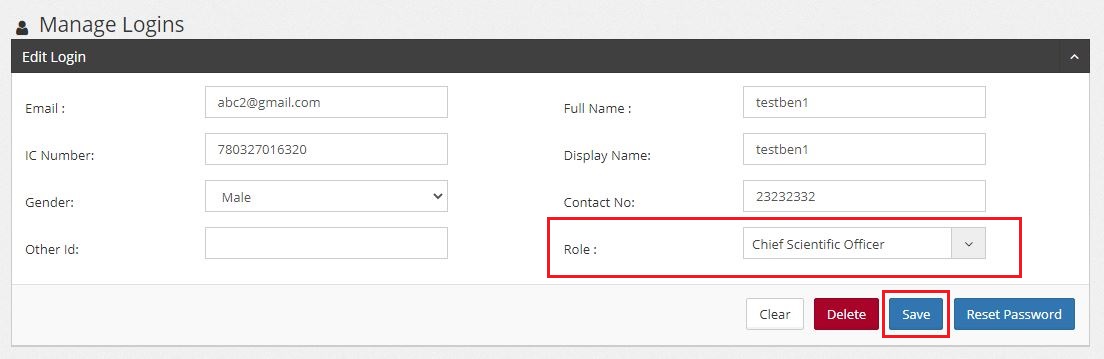
In Manage Logins page, to add a new login user can click the blue + button, for edit existing user just simply click the row of user and a slide down form will display on top of the table.
To change the role of user, look for Role on the form, and choose another role from the dropdown / list selection. Once complete the editing, click “Save” button for update.
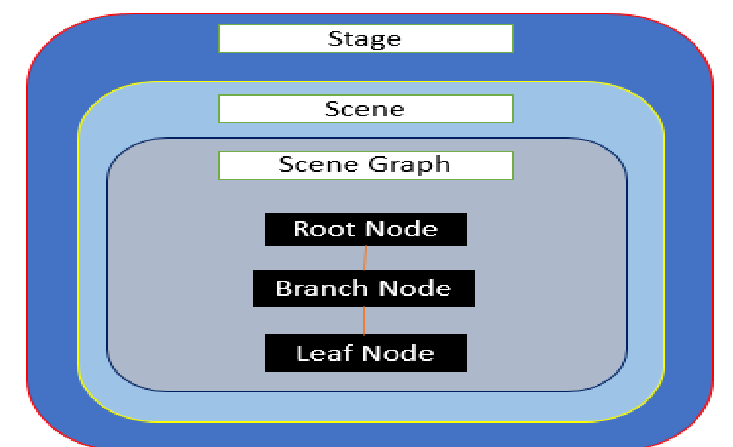
Develop a multiple page window application using JavaFx. Use Scene Builder app to design front-end and RESTAPIs endpoints, process JSON to get data and populate in containers and controls. Show complete testresults, single patient testresults and quality control showing statistics, LJcharts, DataTable vertical view and horizontal view and NOVA screens. Configure into a deployable jar using maven.
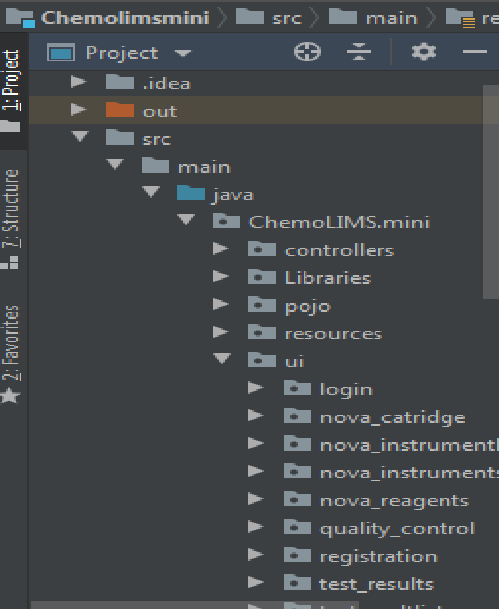
Project Structure
Project follows maven structure
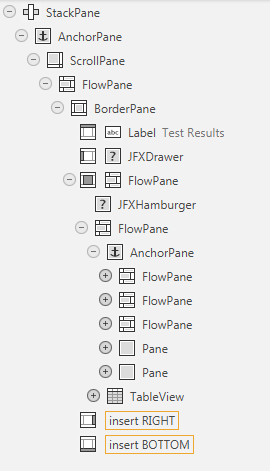
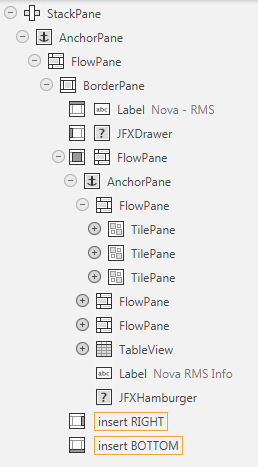
Each page in the application will have a FXML file and related controller file. We can find all the controller java files in the following path. Path => Chemolimsmini\src\main\java\ChemoLIMS\mini\ui.
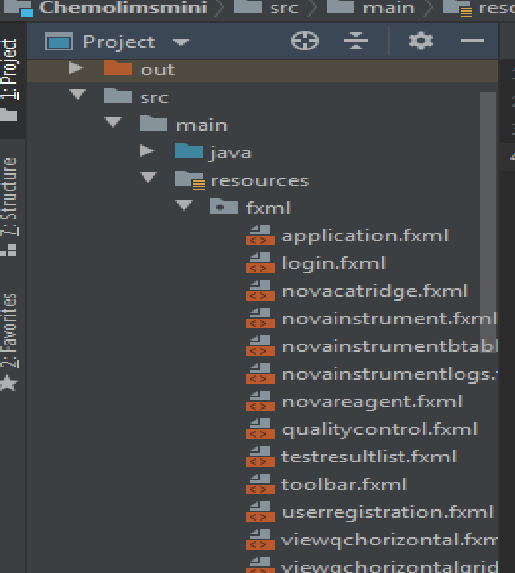
We can find all the FXML files in the following path. Path => Chemolimsmini\src\main\resources\fxml.
POJO classes(Model) to map the json is at the following path. Path => Chemolimsmini\src\main\java\ChemoLIMS\mini\pojo.
External Jars used for feature development is placed at the following location. Path => Chemolimsmini\src\main\java\ChemoLIMS\mini\Libraries
Images, icon and other resources were stored in the following path. Path => Chemolimsmini\src\main\resources\resrc
RestClient
RestClient allows you to send authenticated HTTP requests to a server. It is the entry point for all rest service operations.The RestClient.java can be found in the following path. Path => Chemolimsmini\src\main\java\ChemoLIMS\mini\controllers\RestClient.java
Global Variables
Since we are using endpoints to get data and accessing server with both internal and external IP it is recommended to declare the domain globally as a variable. Some of the globally declared variables are as follows.
public static RestClient restClient = new RestClient();
public static ObjectMapper mapper = new ObjectMapper();
public static String endpointurl = "http://chemolims.chemopharm.com";
public static String endpointurl = "http://cidevsvr";
These variables are declared globally in the following location. Chemolimsmini\src\main\java\ChemoLIMS\mini\controllers\GlobalVariables.java
Application Theme
The theme of application classified into two(dark theme and light theme).It is an user configurable theme, an user can select the theme type before logging in.
Application Css
We are using custom css for styling the application. Included two css files one for the dark mode and another for light mode. The following css files can be found at the below location.
Dark Theme => Chemolimsmini\src\main\resources\StyleSheets\darkcss\style.css
The application uses several jars for enhancement. The below are some of the jars and its purpose.
jackson-annotations-2.10.0.pr3 => Jackson is a simple java based library to serialize java objects to JSON and vice versa.
jackson-databind-2.10.0.pr3 => Data Binding API is used to convert JSON to and from POJO (Plain Old Java Object) using property accessor or using annotations.
Search Command Prompt (CMD) on Start Menu, right click and select “Run as administrator”
Step 2:
In CMD, “cd” to the path of “C:\Program Files\Java\jre8\bin”.
Step 3:
Export the certificate storing file to plain text to search correct aliasname, by using command keytool -list -keystore ../lib/security/cacerts -rfc > C:\Users\master\Desktop\certfile.txt
Password may require: changeit
.txt file was created under desktop, you can look for certfile.txt
Step 4:
Look for the latest “Creation date” and that’s the certificate using and require to replace a new certificate. Take note on the “Alias Name”, for example NameOfTheAlias
Step 5:
Once locate the alias name, back to Administrator Command Prompt and insert command keytool -delete -alias NameOfTheAlias -keystore ../lib/security/cacerts
NameOfTheAlias is the alias name, how’s going to retrieve may refer Step 3 & Step 4
Password may require: changeit
Once successfully remove old certificate, minimize CMD and proceed next step.
Step 6:
Open browser (Google Chrome) and navigate to API connect URL (for example: https://app.geneexpress.com/api/1.0/). Retrieve the certificate by click the lock beside URL > Certificate > Details > Copy to file… , select Base-64 encoded X.509, and complete the wizard for export to Desktop/Folder. Extension may select (.cer) or (.crt).
Step 7:
Once certificate successfully downloaded, rename to any specific project for easy search in future, for example: ge2020.crt / ge2020.cer
You may store certificate file under a folder (for example, store under C:\apps\chemolimsnx)
Step 8:
Open back the CMD minimize from Step 5, make sure the CMD existing path is at “C:\Program Files\Java\jre8\lib\security”, let said the certificate name we just added at Step 6 & Step 7 is call “ge2020.crt”, and store under chemolimsnx folder, insert below command:
To assign database, for shortcut quick click “Shift” twice, and look for webappcore\src\main\resources\application.properties
Look from line 1x, you will found the line of code “spring.datasource.url”, simply change to the database you want:
[image_with_text image=’https://docs.chemoinformatics.com/wp-content/uploads/2020/10/chemolimsnx-frontend-backend-setup-screen1.jpg’ title=” title_color=” title_tag=”]- localhost:5434 can change to your desire port using
– temp_dwnp_live can change to your desire database name
[/image_with_text]
CALL FUNCTIONS: GET, UPDATE, DELETE:
Each module contains one of FomService.js file under sections folder. FormService will contain all the method to be call from backend to frontend. Refer below image for the page view.
Step 2: Fronend, open the new created json file, change:
– href to the module url path
– title to module full name
– package to module short name / call name
Step 3: Backend, open file from or shortcut click “shift” twice, and search for apps\common\config\WebappProperties.java
– Insert module short name / call name into last value of MODS_ALL
– MODS_yourmodulename can be added, but remember to change the value from String modules
[/image_with_text]
Step 3: Create or duplicate an existing permissions.yml file, and change the content to your module permission style:
– modulecode change to your module short name / call name
– modulename change to your module full name
– id is the page of id ($scope.pageid)
– actions is the permission you set for the page ($scope.permissions)
– access is the level of person can be access below of the page(s)
[/image_with_text]
Step 5: Copy & paste the complete version of code from permission.yml into the textfield of the popup and click “Install” button. Now permission should install according the format you set.
[/image_with_text]
API Connection:
For certain client such as Elken DNAecomLab, our Chemolims NX application has to communicate with their third party system to retrieve data into our application.
Navigate webappcore\src\main\resources\application.properties and scroll to line 5x, you should have this few line of code to setup Elken TruYou API.
– webapp.dnaecomlab.truyouapi.url for API url, have to concern about the certificate of expiration
– webapp.dnaecomlab.truyouapi.enabled for enable/disabled API function in the application
[/image_with_text]
After an update has been made or certain new file added, you have to re-compile the new file with the local application, to do it follow below guide:
After boot intellij, navigate to a JS file or for shortcut click “Shift” twice and insert \webappcore\src\main\resources\static\apps\gulpfile.js
To specific which module to run for gulp, scroll to line 2x and change xcommon & xmodule
[image_with_text image=’https://docs.chemoinformatics.com/wp-content/uploads/2020/10/start-chemolimsnx-module-screen1.jpg’ title=” title_color=” title_tag=”]- xcommon to specific which common module using
– xmodule to specific which module will be editing[/image_with_text]
Navigate to below and look for “Terminal” to click. A terminal panel shall pop up/float up, refer sample image in below.
[image_with_text image=’https://docs.chemoinformatics.com/wp-content/uploads/2020/10/start-chemolimsnx-module-screen2.jpg’ title=” title_color=” title_tag=”]- Ensure the path of terminal prompt is same as the path you import project by selecting build.gradle from Setup ChemoLIMS NX Project.[/image_with_text]
Insert “env” and auto redirect will be direct to static\apps folder path.
Finished build module, ton of message will be prompt until it shows finished buildmods in last line. Insert “gulp buildapp” to build up the overall application.
Lastly, after finished buildapp message been prompt, insert “gulp” to do a full compile and finalize and keep gulp running so you won’t need to insert command for every time if file update/modify.
For every moment you have update, modify or any action been done in existing application file, you have to build the module again to trigger gulp run update command. To do this, on the top left of intellij, navigate to “Build” and click “Build Module” for TWICE to keep the update.
Need to install a plugin so that Microsoft Excel can communicate with PostgreSQL DB.
Plugin name: psqlodbc
Download Link: https://www.postgresql.org/ftp/odbc/versions/msi/
Notes: Choose a msi installer based on your office version. In this case it use 32 bit version.
       Can choose the latest version. In this case I download version psqlodbc_12_01_0000-x86.
Steps
After download the installer, we will get a zip file that contains a msi type file and a README file. Double click the msi installer and just proceed like a normal installation. Choose default option for all setting.
After finish all the installation step, go to ‘Control Panel\Programs\Programs and Features’ and check whether psqlODBC was successfully installed on your machine or not.
To start connecting Microsoft Excel to PostgreSQL DB, open any Excel sheet and go to Data -> Get External Data -> From Microsoft Query and click that option.
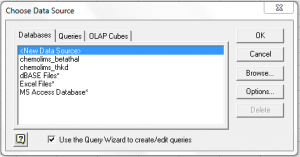
Then a popup window will appear asking for data source connection. Choose <New Data Source> and click OK.
For option 1, put any name that you like for this datasource connecetion, in this case it is called ‘excel_postgreSQL’. Option 2, choose ‘PostgreSQL Unicode’. Then for Option 3, click on the connect button and another popup will open.
For this popup window, it will ask for your postgreSQL connection. Fill in the form based on your setup. Click OK after finish filling all field.
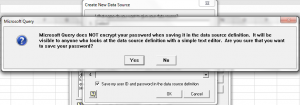
It will bring us back to Create New Data Source popup window. Optional step, you can choose to save User ID and password for this datasource setup.
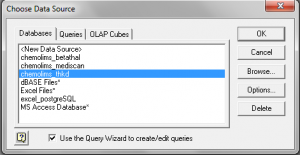
After that, choose the datasource that you just created and click OK.
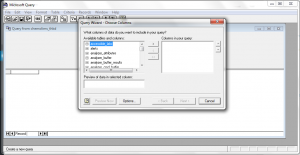
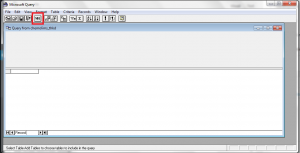
Then Query Wizard will appear, this wizard is a tool use to get record from PostgreSQL DB without need to write a query. In this case, just closed that window and use Microsoft Query window to create your own query.
Click on the SQL button inside the window, to show SQL script window so we can put customize query to get all the record.
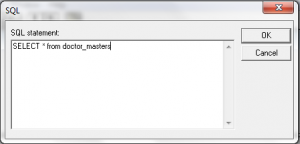
After click on that SQL button, another window will popup and can put customize query on that window to generate the result as wanted.
After that, click OK and and it will go back to Microsoft Query window. If the query is valid, it will automatically show the result at this window. If already satisfied with the query, click Return Data button on the top to populate the record at Excel sheet.
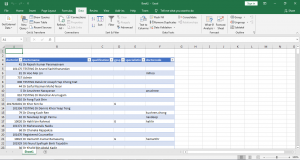
Another window will appear asking on how we want to show the record inside Excel sheet and asking where do you want to populate the record (eg: in sheet 1 cell A10).
This is the final result for this session.
Extra Notes
Red box -> Refresh All -> Use to refresh and fetch new record for database based on the query. Green box -> Properties -> Excel and connection configuration. This is also where you can edit your query and connection setting.
Query withParameter
Excel can also accept query with parameter. To use this feature, you need to insert question mark (?) inside the query. It will detect
this symbol and automatically asking for parameter value. It also can accept multiple parameter. Parameter number will be based on the
symbol sequence inside the query.
Steps to produce
Exactly the same step, Open any Excel sheet and go to Data tab.
Choose Get External Data -> From Other Sources -> From Microsoft Query.
It will prompt Choose Data Source window, choose previously created data source or can create a new data source by following the step mention previously in this document.
After choosing data source, insert Username and Password for the data source if applicable.
Then it will show Query Wizard window, just choose Cancel option.
After that it will show Add Table window, just choose Close option.
Choose SQL option and insert this query: SELECT doctorid, doctorname, qualification, gpsp, specialistin, doctorcode FROM doctor_masters where doctorname = ?
The question mark symbol will indicate a parameter that user can dynamically choose the value for it. Excel will automatically prompt a parameter window and you can insert the value. In this case you just put Admin value
After click OK, it will show the result and you can click Return Data to show the record inside Excel sheet.
Fetch New Data With Drop down Selection
Previously we managed to create a query that accept parameter so we can put any value and change that value whenever needed. In this case, it
will show how the data will  keep on changing based on value selection.
1. Create new drop down list to use as selection. Click on any cell, then go to Data tab, choose Data Validation. Choose Type List and
Select the Source.
2. Select cell that have the query record, then inside Data tab, choose the properties to change the query properties. Then click on Connection
properties button beside Connection name field.
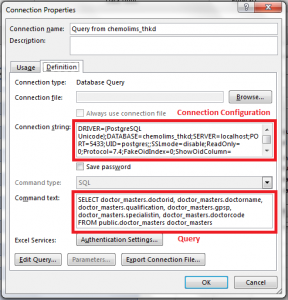
3. Then it will shows Connection properties window and click on the Definition tab. Inside that tab, it has Connection properties and query
that had been created previously. Make sure your query have question mark symbol (?) to make this things work.
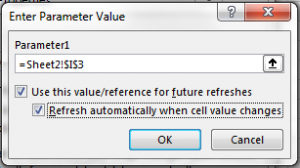
4. Inside this window, just click OK button, then it will prompt Enter Parameter Value and you need to choose the cell that had drop down list
and check those 2 option also.
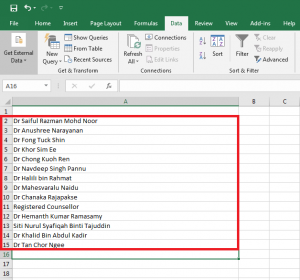
5. After you click OK, then if your query is valid and data existed, the record value will keep on changing when you change the drop down value.
Here is sample record display after we change the drop down value.
For results transmission to Nova Vesalius HIS, the generated HL7 message contains the result’s a flag to indicate whether the result has been revalidated or not.
Script to Reset Revalidate Flag
UPDATE pmo_patient_specimens
   SET firsttransmitted=null, lasttransmitted=null
 WHERE
sampleid = _sample_barcode_number_
_sample_barcode_number_ is the value from the sampleid column ofr the pmo_patient_specimens table.
When doing “SVN Commit”, the messages field should be filled up with relevant information. Effort should be made to avoid pushing cumulative tickets. Here is the minimum amount of information to be filled:-
MantisBT ticket no. in the format of: #M[TicketCode][TicketID]
Ticket Code:
B – bug
E – enhancement
F- feature
O – others
Short description of the codes to be committed.
For example, to push a bug with ID 786, the commit message would be:-


 For option 1, put any name that you like for this datasource connecetion, in this case it is called ‘excel_postgreSQL’. Option 2, choose ‘PostgreSQL Unicode’. Then for Option 3, click on the connect button and another popup will open.
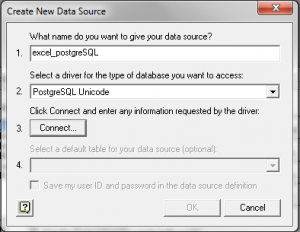 For this popup window, it will ask for your postgreSQL connection. Fill in the form based on your setup. Click OK after finish filling all field.
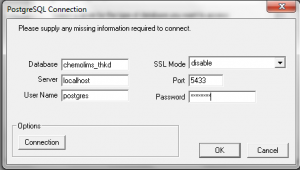
 After that, click OK and and it will go back to Microsoft Query window. If the query is valid, it will automatically show the result at this window. If already satisfied with the query, click Return Data button on the top to populate the record at Excel sheet.
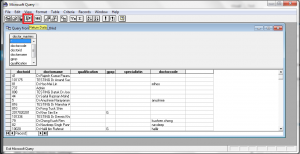 Another window will appear asking on how we want to show the record inside Excel sheet and asking where do you want to populate the record (eg: in sheet 1 cell A10).
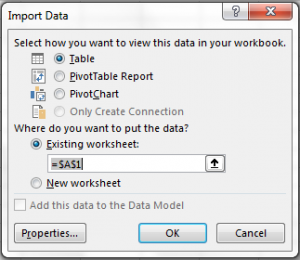
 Red box -> Refresh All -> Use to refresh and fetch new record for database based on the query. Green box -> Properties -> Excel and connection configuration. This is also where you can edit your query and connection setting.
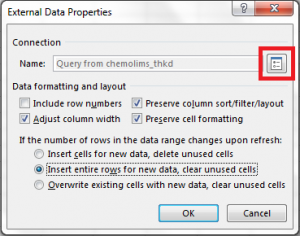

 2. Select cell that have the query record, then inside Data tab, choose the properties to change the query properties. Then click on Connection
properties button beside Connection name field.
3. Then it will shows Connection properties window and click on the Definition tab. Inside that tab, it has Connection properties and query
that had been created previously. Make sure your query have question mark symbol (?) to make this things work.
4. Inside this window, just click OK button, then it will prompt Enter Parameter Value and you need to choose the cell that had drop down list
and check those 2 option also.
2. Select cell that have the query record, then inside Data tab, choose the properties to change the query properties. Then click on Connection
properties button beside Connection name field.
3. Then it will shows Connection properties window and click on the Definition tab. Inside that tab, it has Connection properties and query
that had been created previously. Make sure your query have question mark symbol (?) to make this things work.
4. Inside this window, just click OK button, then it will prompt Enter Parameter Value and you need to choose the cell that had drop down list
and check those 2 option also.
 5. After you click OK, then if your query is valid and data existed, the record value will keep on changing when you change the drop down value.
Here is sample record display after we change the drop down value.
5. After you click OK, then if your query is valid and data existed, the record value will keep on changing when you change the drop down value.
Here is sample record display after we change the drop down value.


